How to Make Fruit-Based Skincare at Home
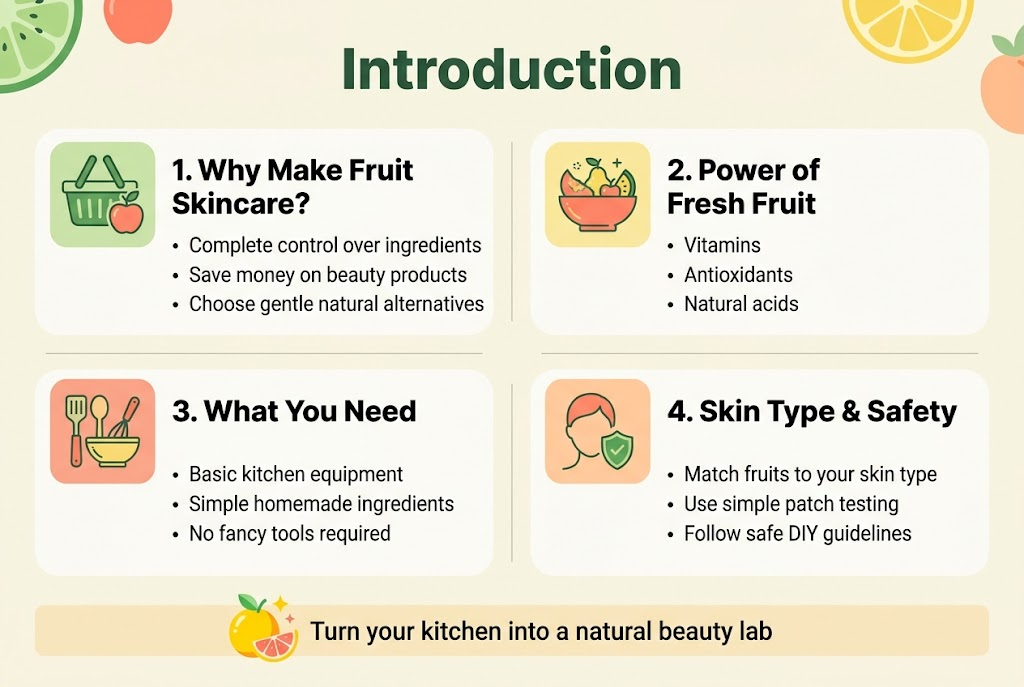
Making your own fruit-based skincare at home gives you complete control over what goes on your skin while saving money on expensive beauty products. This guide is perfect for skincare enthusiasts, budget-conscious beauty lovers, and anyone wanting to ditch harsh chemicals for gentle, natural alternatives.
Fresh fruits contain powerful vitamins, antioxidants, and natural acids that can transform your skin when used correctly. You don't need fancy equipment or hard-to-find ingredients – most DIY fruit skincare recipes use items already sitting in your kitchen.
We'll start by covering the essential equipment and ingredients you need to create effective homemade fruit face masks and treatments. Then you'll learn how to match specific fruits to your skin type for the best results. Finally, we'll explore simple safety guidelines and patch testing protocols to keep your DIY skincare journey safe and successful.
Ready to turn your kitchen into a natural beauty lab? Let's dive into the world of organic fruit skincare that rivals expensive spa treatments.
Essential Equipment and Ingredients for DIY Fruit Skincare
Basic kitchen tools you already own for skincare preparation
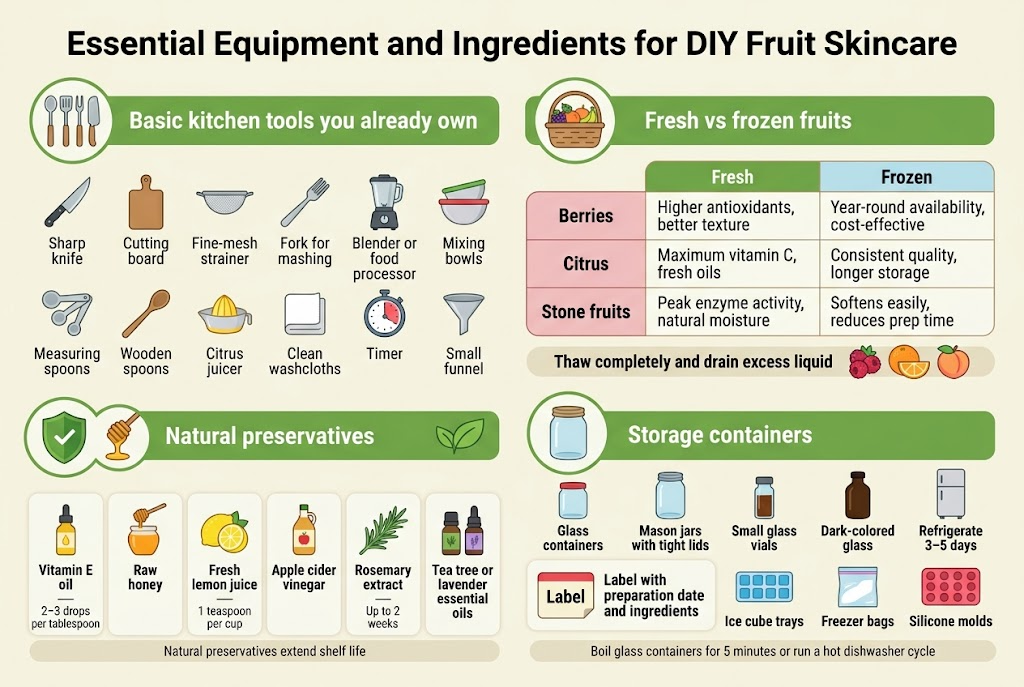
Your DIY fruit skincare journey doesn't require expensive equipment. Start with a sharp knife for precise fruit chopping and a cutting board dedicated to beauty prep. A fine-mesh strainer helps separate pulp from juice, while a regular fork works perfectly for mashing soft fruits like bananas and avocados.
A basic blender or food processor transforms harder fruits into smooth pastes ideal for face masks. Clean mixing bowls in various sizes accommodate different batch quantities, and measuring spoons ensure consistent results. Wooden spoons prevent metal oxidation that can affect fruit-based beauty treatments, while a citrus juicer maximizes extraction from lemons and oranges.
Keep a set of clean washcloths nearby for easy application, and have a timer ready since fresh fruit masks require specific timing for optimal results. A small funnel makes transferring liquid treatments into storage containers mess-free.
Fresh vs frozen fruits: choosing the best options for your skin
Fresh fruits deliver maximum potency for immediate use in homemade fruit face masks and natural skincare recipes. Peak ripeness provides the highest concentration of vitamins, enzymes, and natural acids that benefit your skin. Choose organic options when possible to avoid pesticide residues in your DIY fruit skincare routine.
| Fruit Type | Fresh Benefits | Frozen Benefits |
|---|---|---|
| Berries | Higher antioxidants, better texture | Year-round availability, cost-effective |
| Citrus | Maximum vitamin C, fresh oils | Consistent quality, longer storage |
| Stone fruits | Peak enzyme activity, natural moisture | Softens easily, reduces prep time |
Frozen fruits work wonderfully for DIY beauty recipes when fresh options aren't available. They're pre-washed and often picked at peak ripeness before freezing. Thaw completely before use and drain excess liquid to prevent diluted formulations. Frozen berries actually release more antioxidants after thawing, making them excellent for anti-aging treatments.
Natural preservatives to extend your homemade products' shelf life
Without synthetic preservatives, fruit-based beauty treatments have limited lifespans. Vitamin E oil acts as a natural antioxidant, preventing rancidity in oil-based formulations. Add 2-3 drops per tablespoon of mixture. Raw honey possesses antimicrobial properties that naturally preserve fruit skincare ingredients while adding moisturizing benefits.
Fresh lemon juice provides natural preservation through its acidic pH and vitamin C content. Use one teaspoon per cup of fruit mixture. Apple cider vinegar offers similar benefits with additional skin-balancing properties for oily skin types.
Rosemary extract, available at health stores, extends shelf life up to two weeks when added to organic fruit skincare formulations. Essential oils like tea tree or lavender provide antimicrobial protection while enhancing aromatherapy benefits.
Storage containers that keep your creations fresh and effective
Glass containers preserve the integrity of fruit-based treatments better than plastic alternatives. Mason jars with tight-fitting lids prevent contamination and are perfect for larger batches of DIY skincare at home recipes. Small glass vials work well for single-use portions.
Dark-colored glass protects light-sensitive ingredients like vitamin C from degradation. Store most fruit treatments in the refrigerator, where they stay fresh for 3-5 days. Label containers with preparation dates and ingredients for safety tracking.
Ice cube trays create convenient single-use portions of liquid treatments. Once frozen, transfer cubes to freezer bags for longer storage. Silicone molds work excellently for creating shaped treatment bars that combine fruits with nourishing oils.
Always use clean, sterilized containers to prevent bacterial growth. Boil glass containers for five minutes or run them through a hot dishwasher cycle before use. This simple step dramatically extends the life of your homemade natural face masks for skin types.
Understanding Your Skin Type and Matching Fruits
Identifying oily skin and the best citrus solutions
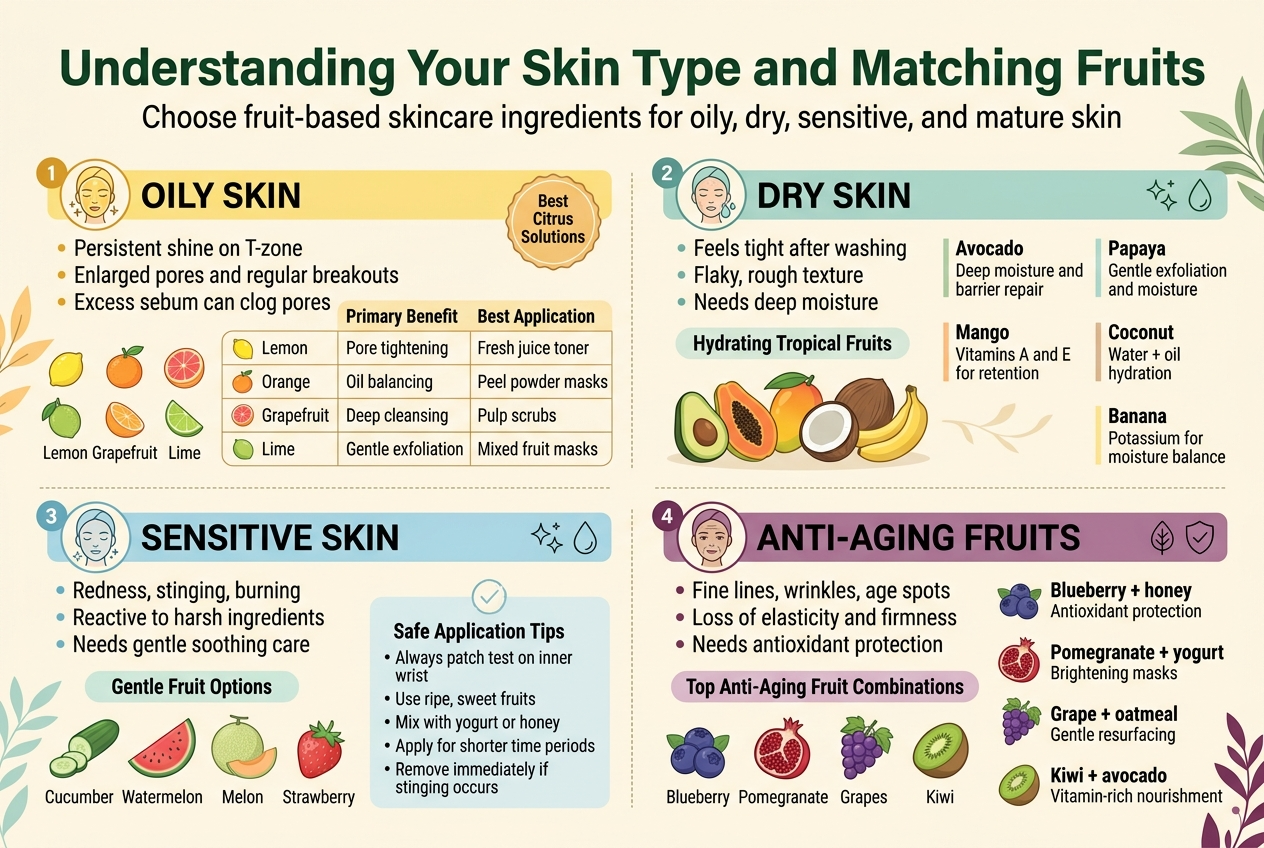
Oily skin often shows up as a persistent shine across your T-zone, enlarged pores, and a tendency to break out regularly. When you touch your face mid-day, it feels slick and greasy, especially around your forehead, nose, and chin. This skin type produces excess sebum, which can clog pores and lead to blackheads and acne.
Citrus fruits become your best friends for DIY fruit skincare when dealing with oily skin. Lemons pack natural alpha-hydroxy acids that gently exfoliate dead skin cells while their astringent properties help tighten pores. Orange peels contain vitamin C and natural oils that balance sebum production without over-drying your skin.
Grapefruits offer powerful cleansing benefits thanks to their natural enzymes and citric acid content. The fruit's natural acidity helps dissolve excess oils while promoting cell turnover. Limes work similarly to lemons but with slightly gentler action, making them perfect for those with oily but somewhat sensitive skin.
| Citrus Fruit | Primary Benefit | Best Application |
|---|---|---|
| Lemon | Pore tightening | Fresh juice toner |
| Orange | Oil balancing | Peel powder masks |
| Grapefruit | Deep cleansing | Pulp scrubs |
| Lime | Gentle exfoliation | Mixed fruit masks |
Dry skin remedies using hydrating tropical fruits
Dry skin feels tight, especially after washing, and often appears flaky or rough to the touch. You might notice fine lines more prominently, and your skin drinks up moisturizer quickly without staying hydrated for long. This skin type lacks natural oils and struggles to maintain its moisture barrier.
Tropical fruits bring intense hydration through their natural water content and nourishing oils. Avocados lead the pack with their rich, creamy texture packed with healthy fats that deeply moisturize and repair the skin barrier. The fruit's natural oils penetrate deeply, providing long-lasting hydration that synthetic moisturizers often can't match.
Papayas contain enzymes that gently remove dry, dead skin cells while their high water content delivers immediate moisture. Mangoes offer vitamins A and E alongside natural sugars that help retain moisture in your skin cells. Coconut provides both the refreshing water and the oil, creating a complete hydration system.
Bananas might seem ordinary, but they're hydration powerhouses. Their potassium content helps maintain skin moisture balance, while natural sugars provide immediate plumping effects. The fruit's creamy texture makes it perfect for homemade fruit face masks that leave dry skin feeling soft and supple.
Sensitive skin-friendly gentle fruit options
Sensitive skin reacts quickly to harsh ingredients with redness, stinging, or burning sensations. You might experience irritation from products that work fine for others, and your skin often feels uncomfortable or reactive to temperature changes and environmental factors.
Gentle fruits become essential for natural skincare recipes when your skin is easily irritated. Cucumbers, technically fruits, top the list with their cooling, anti-inflammatory properties. Their high water content soothes irritation while natural antioxidants calm redness and swelling.
Watermelons offer similar cooling benefits with added vitamins that nourish without irritation. Their gentle nature makes them perfect for reactive skin that needs hydration without aggravation. Melons in general provide soothing relief while delivering essential nutrients.
Strawberries, when used properly, can be gentle despite their mild acidity. Their natural salicylic acid content is much lower than synthetic versions, making them suitable for sensitive skin that needs gentle exfoliation. Always use ripe, sweet strawberries rather than tart, unripe ones.
Safe application tips for sensitive skin:
-
Always patch test new fruits on your inner wrist
-
Use ripe, sweet fruits rather than tart varieties
-
Mix fruits with calming ingredients like yogurt or honey
-
Apply for shorter time periods initially
-
Remove immediately if any stinging occurs
Anti-aging powerhouse fruits for mature skin concerns
Mature skin shows signs of aging like fine lines, wrinkles, age spots, and loss of elasticity. You might notice your skin doesn't bounce back as quickly as it used to, and areas that were once firm now show sagging or uneven texture.
Antioxidant-rich fruits become your weapons against aging in DIY skincare at home routines. Blueberries pack more antioxidants than almost any other fruit, fighting free radical damage that accelerates aging. Their anthocyanins help rebuild collagen while protecting existing skin structure.
Pomegranates deliver powerful anti-aging compounds through their rich, ruby seeds. The fruit's natural ellagic acid promotes cell regeneration while its vitamin C content brightens age spots and evens skin tone. Pomegranate masks can help restore youthful radiance to tired-looking skin.
Grapes, especially the red and purple varieties, contain resveratrol - the same compound that makes red wine famous for its anti-aging properties. This powerful antioxidant helps protect skin cells from damage while promoting healthy cell turnover.
Kiwi fruits surprise many with their anti-aging power. They contain more vitamin C than oranges, plus vitamin E and natural alpha-hydroxy acids that work together to brighten skin and reduce fine lines. The fruit's enzymes help speed up cell renewal for fresher-looking skin.
Top anti-aging fruit combinations:
-
Blueberry + honey for antioxidant protection
-
Pomegranate + yogurt for brightening masks
-
Grape + oatmeal for gentle resurfacing
-
Kiwi + avocado for vitamin-rich nourishment
Simple Face Masks That Deliver Professional Results
Brightening Lemon and Honey Mask for Glowing Skin
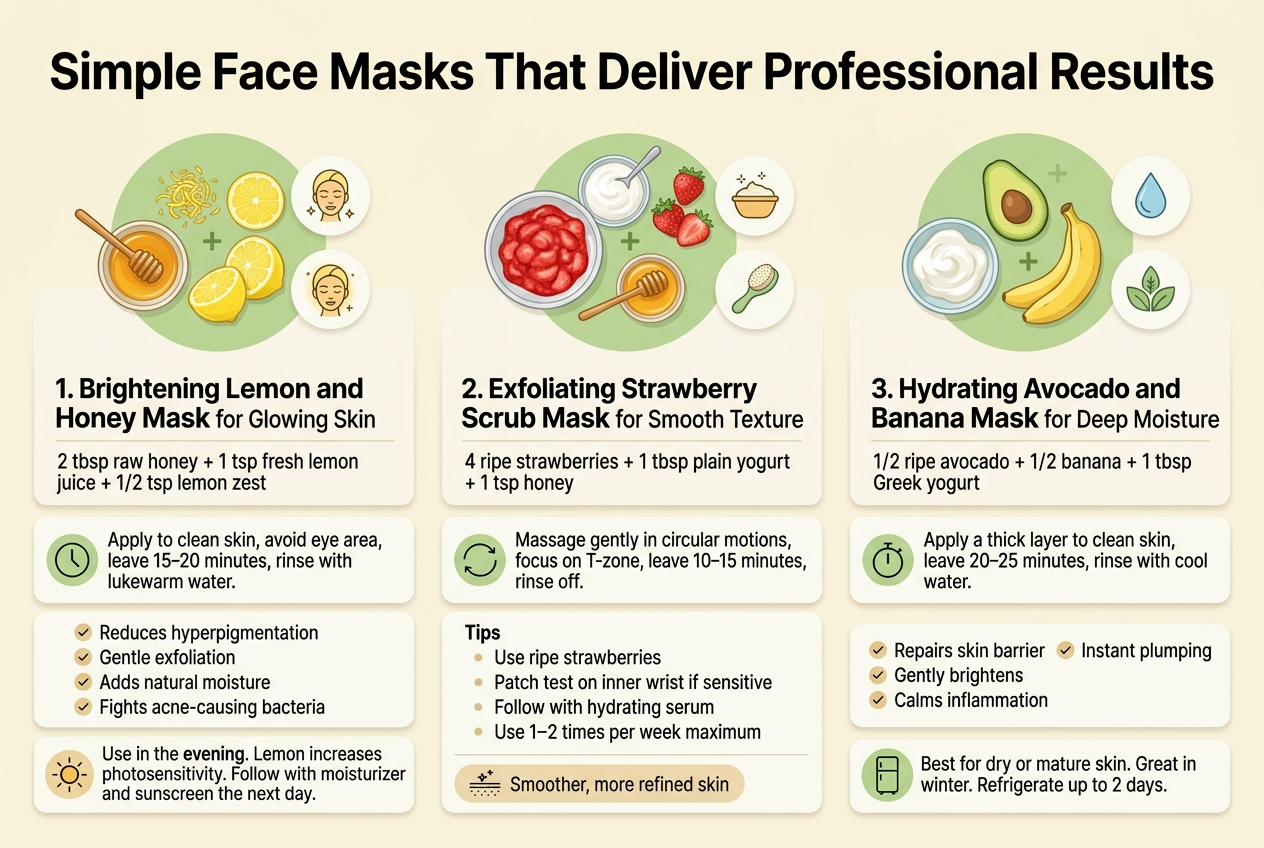
This powerhouse combination delivers radiant skin through natural vitamin C and antimicrobial properties. Lemon juice contains citric acid that gently exfoliates dead skin cells while honey acts as a humectant, drawing moisture into your skin. Mix two tablespoons of raw honey with one teaspoon of fresh lemon juice and half a teaspoon of lemon zest for added texture.
Apply the mixture to clean skin, avoiding the eye area since lemon can be irritating to sensitive skin around the eyes. Leave on for 15-20 minutes before rinsing with lukewarm water. The natural enzymes in honey work to brighten your complexion while the lemon helps fade dark spots and even skin tone.
Key Benefits:
-
Reduces hyperpigmentation
-
Provides gentle exfoliation
-
Adds natural moisture
-
Fights acne-causing bacteria
Always use this mask in the evening since lemon increases photosensitivity. Follow up with a gentle moisturizer and never skip sunscreen the next day.
Exfoliating Strawberry Scrub Mask for Smooth Texture
Strawberries pack a double punch with their natural alpha hydroxy acids (AHAs) and tiny seeds that provide gentle physical exfoliation. The salicylic acid naturally present in strawberries makes this DIY fruit skincare recipe perfect for oily or acne-prone skin types.
Mash four ripe strawberries with one tablespoon of plain yogurt and one teaspoon of honey. The lactic acid in yogurt enhances the exfoliating effects while honey soothes potential irritation. Apply the mixture in gentle circular motions, focusing on areas with rough texture like your T-zone.
Allow the mask to sit for 10-15 minutes before gently massaging again and rinsing off. The natural fruit acids work to dissolve dead skin cells while the physical scrubbing action from strawberry seeds removes surface buildup.
Application Tips:
-
Use only ripe strawberries for maximum enzyme activity
-
Test on inner wrist first if you have sensitive skin
-
Follow with a hydrating serum
-
Use 1-2 times per week maximum
This homemade fruit face mask leaves skin noticeably smoother and more refined after just one use.
Hydrating Avocado and Banana Mask for Deep Moisture
Perfect for dry or mature skin, this creamy mask delivers intense hydration through healthy fats and natural humectants. Avocados contain omega-3 fatty acids and vitamins E and K, while bananas provide potassium and natural sugars that help skin retain moisture.
Mash half a ripe avocado with half a banana until completely smooth. Add one tablespoon of plain Greek yogurt for extra protein and probiotics that support skin barrier function. The result is a luxurious mask that feels like an expensive spa treatment.
Apply a thick layer to clean skin and relax for 20-25 minutes. The longer application time allows these natural skincare recipes to penetrate deeper into skin layers. Rinse with cool water and follow with your regular moisturizer.
Why This Combination Works:
-
Avocado fats repair damaged skin barriers
-
Banana enzymes gently brighten
-
Yogurt probiotics calm inflammation
-
Natural sugars provide instant plumping
This organic fruit skincare treatment works especially well during winter months when skin needs extra nourishment. The mask can be refrigerated for up to two days, making it easy to prep multiple treatments at once.
Nourishing Body Treatments Using Whole Fruits
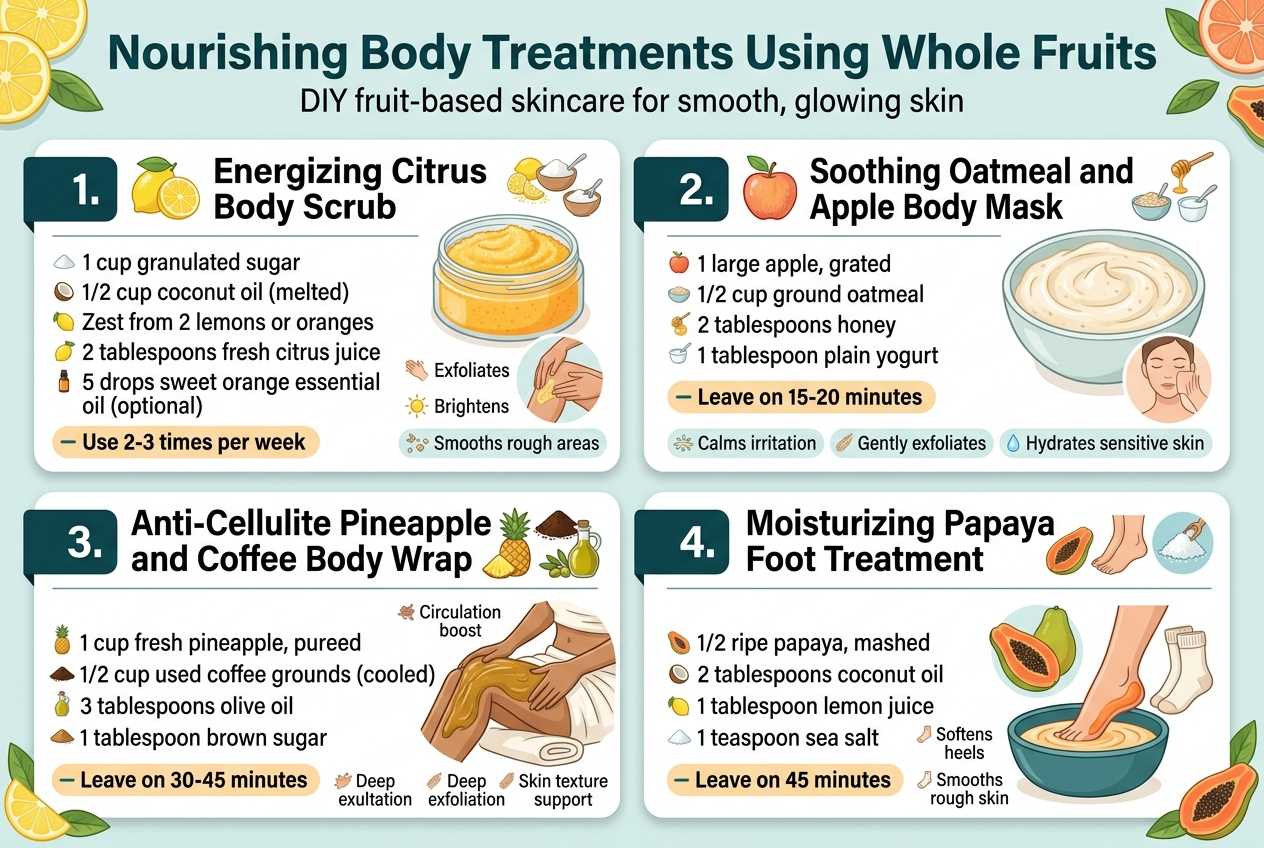
Energizing Citrus Body Scrub for Silky Smooth Skin
Creating your own citrus body scrub transforms ordinary shower time into a spa-like experience. This DIY fruit skincare treatment combines the exfoliating power of sugar with vitamin C-rich citrus fruits that brighten and refresh tired skin.
Ingredients you'll need:
-
1 cup granulated sugar
-
1/2 cup coconut oil (melted)
-
Zest from 2 lemons or oranges
-
2 tablespoons fresh citrus juice
-
5 drops of sweet orange essential oil (optional)
Mix all ingredients in a bowl until well combined. The sugar provides gentle exfoliation while removing dead skin cells, and the citrus delivers antioxidants that help combat free radical damage. Apply the scrub in circular motions, focusing on rough areas like elbows and knees. Rinse with warm water and pat dry.
This natural skincare recipe works best when used 2-3 times per week. The natural acids in citrus fruits help brighten skin tone over time, making this one of the most effective homemade body treatments for achieving smooth, glowing skin.
Soothing Oatmeal and Apple Body Mask for Irritated Skin
When your skin feels angry and inflamed, this gentle combination provides instant relief. Apples contain malic acid, which naturally exfoliates without irritation, while oatmeal acts as a natural anti-inflammatory agent.
What you'll need:
-
1 large apple, grated
-
1/2 cup ground oatmeal
-
2 tablespoons honey
-
1 tablespoon plain yogurt
Blend the grated apple with oatmeal until you achieve a paste-like consistency. Add honey for its antibacterial properties and yogurt for gentle hydration. Apply this mixture generously to clean, damp skin and leave for 15-20 minutes.
The natural enzymes in apples help remove impurities while oatmeal soothes irritated areas. This organic fruit skincare treatment works particularly well for sensitive skin types or after sun exposure. Rinse off with lukewarm water using gentle circular motions to maximize the exfoliating benefits.
Anti-Cellulite Pineapple and Coffee Body Wrap
Pineapple contains bromelain, an enzyme that helps break down proteins and may improve skin texture. Combined with caffeine from coffee grounds, this wrap targets areas prone to cellulite while providing deep hydration.
Recipe ingredients:
-
1 cup fresh pineapple, pureed
-
1/2 cup used coffee grounds (cooled)
-
3 tablespoons olive oil
-
1 tablespoon brown sugar
Mix all components until you have a thick, spreadable paste. Apply to problem areas like thighs and buttocks, then wrap with plastic wrap or old towels. Leave on for 30-45 minutes while relaxing.
The combination of fruit enzymes and caffeine stimulates circulation, potentially improving skin appearance over time. This DIY beauty recipe should be used once weekly for best results. The pineapple's natural acids also help brighten skin tone while the coffee grounds provide mechanical exfoliation.
Moisturizing Papaya Foot Treatment for Soft Heels
Papaya contains papain, a powerful enzyme that breaks down dead skin cells naturally. This makes it perfect for tackling rough, cracked heels that need serious attention.
Treatment ingredients:
-
1/2 ripe papaya, mashed
-
2 tablespoons coconut oil
-
1 tablespoon lemon juice
-
1 teaspoon sea salt
Mash the papaya until smooth, then combine with other ingredients. Soak feet in warm water for 10 minutes first, then apply this mixture generously to heels and rough areas. Cover with cotton socks and leave for 45 minutes.
The enzymes in papaya naturally soften callused skin while coconut oil provides deep moisturization. Lemon juice adds brightening properties, and sea salt offers gentle exfoliation. Use this fruit-based beauty treatment weekly to maintain soft, smooth feet year-round.
This natural approach to foot care avoids harsh chemicals while delivering professional-level results at home.
Safety Guidelines and Patch Testing Protocols
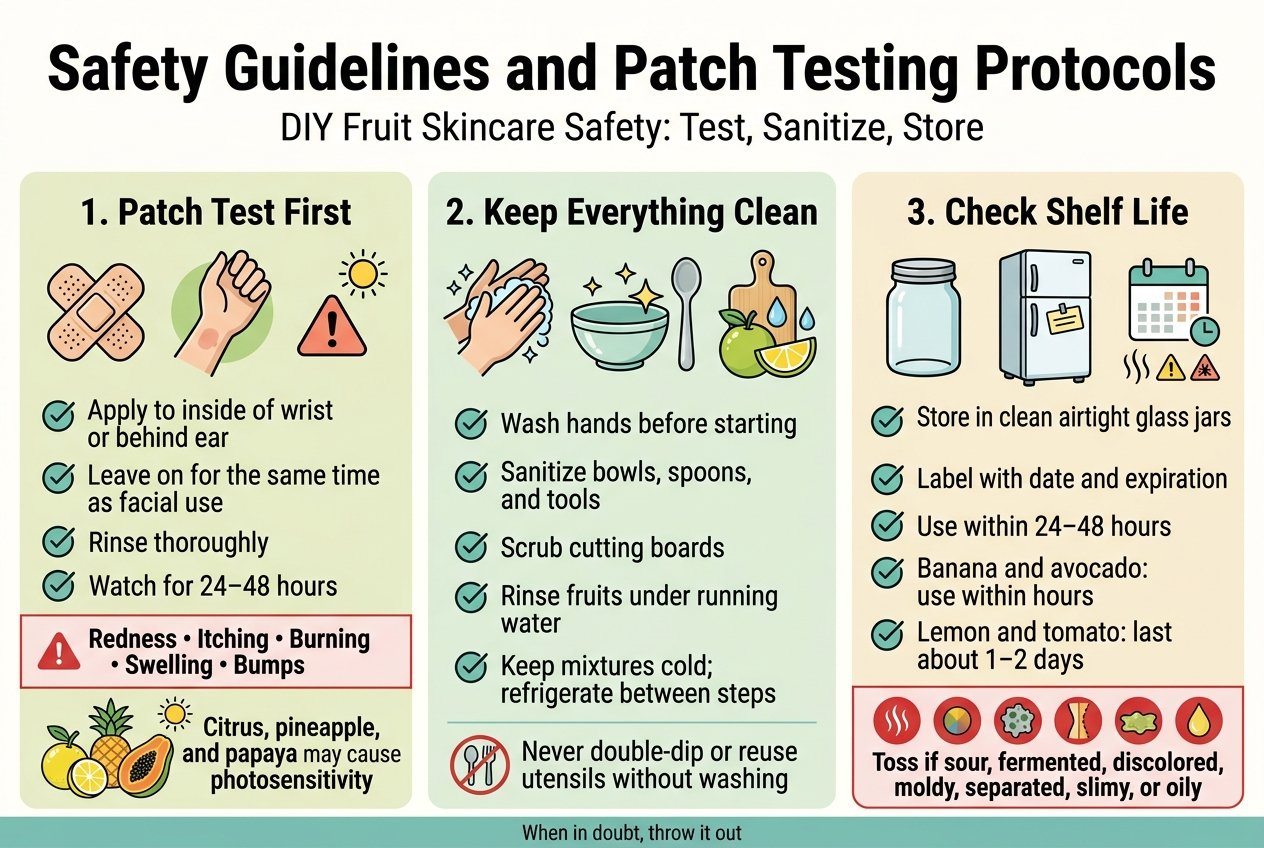
Identifying Potential Allergic Reactions Before Full Application
Before slathering that gorgeous DIY fruit skincare creation all over your face, you need to play it smart with patch testing. Even natural ingredients can trigger unexpected reactions, and fruit acids can be particularly sneaky troublemakers.
Start your patch test by applying a small amount of your homemade fruit face mask or treatment to a discrete area like the inside of your wrist or behind your ear. Choose a spot where your skin is sensitive but hidden from view. Leave the product on for the same amount of time you plan to use it on your face, then rinse thoroughly.
Watch for warning signs over the next 24-48 hours. Redness, itching, burning, swelling, or any unusual bumps mean your skin isn't happy with the ingredients. Some reactions take time to develop, so don't rush this process. If you notice any irritation, skip that particular recipe and try something gentler.
Pay special attention if you're using citrus fruits, pineapple, or papaya in your natural skincare recipes. These contain powerful enzymes and acids that can cause photosensitivity, making your skin more prone to sunburn and dark spots when exposed to sunlight.
Proper Hygiene Practices to Prevent Bacterial Contamination
Your kitchen becomes a skincare laboratory when you're making DIY fruit skincare, so cleanliness is absolutely critical. Dirty tools and contaminated ingredients can introduce harmful bacteria that'll do more damage than good to your skin.
Start with squeaky-clean hands and wash them thoroughly before touching any ingredients or equipment. Sanitize all bowls, spoons, and mixing tools with hot, soapy water or rubbing alcohol. Even that innocent-looking cutting board needs a good scrub.
Use only fresh, high-quality fruits for your organic fruit skincare projects. Rinse all fruits thoroughly under running water, even if you're peeling them. Bacteria love to hang out on fruit skins and can easily transfer to the flesh during cutting.
Keep your DIY beauty recipes cold during preparation and storage. Room temperature creates the perfect breeding ground for bacteria. If your recipe takes more than a few minutes to prepare, pop your mixing bowl in the refrigerator between steps.
Never double-dip or use the same utensil twice without washing it first. Cross-contamination happens faster than you think, and once bacteria gets into your mixture, it multiplies quickly.
Shelf Life Expectations and Signs Your Products Have Expired
Fresh fruit-based beauty treatments have ridiculously short shelf lives compared to store-bought products. Most homemade fruit skincare should be used within 24-48 hours of preparation, and that's being generous.
Store your DIY skincare at home creations in the refrigerator in clean, airtight containers. Glass jars work best because they don't absorb odors or harbor bacteria like plastic containers can. Label everything with the date you made it and the expiration timeline.
Your nose knows when something's gone bad. Fresh fruit treatments should smell pleasant and fruity. If you detect any sour, fermented, or funky odors, toss the product immediately. Visual changes like separation, unusual colors, or fuzzy mold growth are obvious red flags.
Texture changes also signal trouble. If your smooth mask becomes chunky, slimy, or develops an oily film on top, bacteria has likely moved in and made itself comfortable. When in doubt, throw it out.
Some fruits last longer than others in skincare applications. Banana and avocado masks should be used within hours, while more acidic fruits like lemon or tomato might stay fresh for a day or two in the refrigerator. However, playing it safe with same-day use gives you the best results and lowest risk of skin irritation from spoiled ingredients.
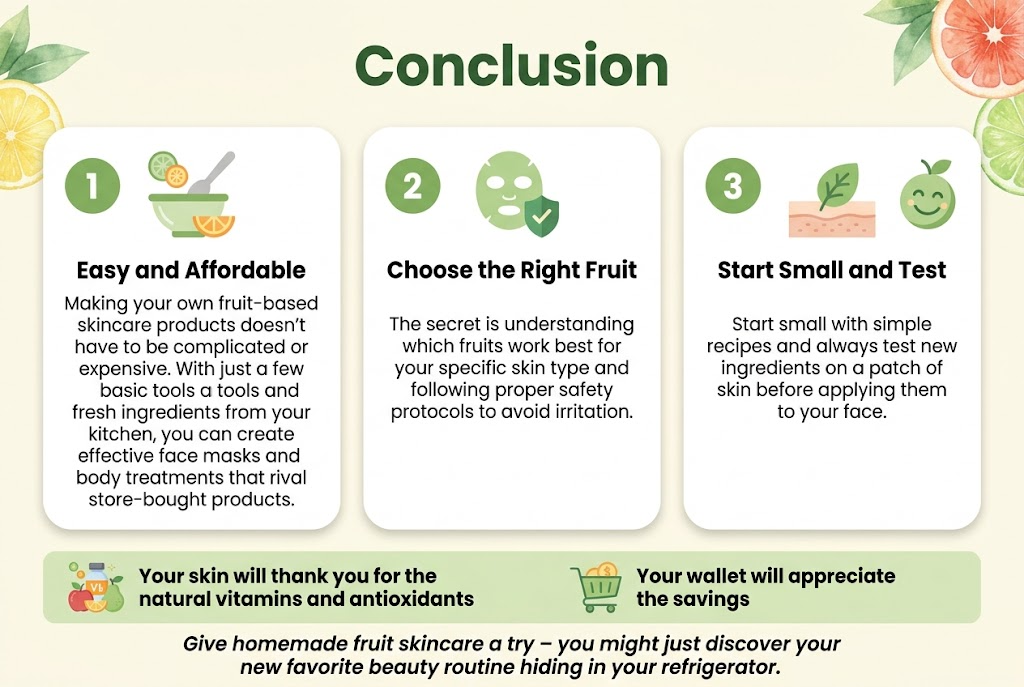
Making your own fruit-based skincare products doesn't have to be complicated or expensive. With just a few basic tools and fresh ingredients from your kitchen, you can create effective face masks and body treatments that rival store-bought products. The secret is understanding which fruits work best for your specific skin type and following proper safety protocols to avoid irritation.
Start small with simple recipes and always test new ingredients on a patch of skin before applying them to your face. Your skin will thank you for the natural vitamins and antioxidants, and your wallet will appreciate the savings. Give homemade fruit skincare a try – you might just discover your new favorite beauty routine hiding in your refrigerator.


Comments
Post a Comment